Info about Yoga Poses During Labor:
Poses relieve pelvic pressure, encourage efficient labor and help make the pushing stage easier. You can also encourage your baby to position itself so that its face is towards your spine rather than your belly, which is generally the most favorable position for birth. In other words, by practicing this flow, you can help stretch your muscles, allow your body to open, as well as help the baby move appropriately and consistently through the birth canal. Staying active also helps your labor progress. Lying flat on your back is not ideal unless it’s a medicated birth, in which case you might not be able to use your legs. Lying flat slows natural labor down and makes the birth process more painful. Laying down also makes it more difficult for the baby to descend over the coccyx or tail bone as this bone curves upward like a hook and blocks the baby’s descent.
If you can use the early labor yoga sequence flow early on in your labor, you can encourage yourself to keep moving throughout the rest of your labor. This is important because when you reach what you think is your threshold for pain, you might not feel like moving at all. If you can find the strength to adjust your positioning while you’re in between contractions, however, you can make your labor easier, faster and more comfortable for you and your baby in the long-run.
Info about Breathing Techniques During Labor:
There have been many studies on the effects of breathing to reduce pain. You can see some of these studies on the Evidence Based Birth Website as well as the American Association of Pregnancy. Short, shallow breaths held primarily in the chest are associated more with the sympathetic nervous system. This is the fight, flight, freeze or faint mode we get into when we’re under stress. If you can focus on breathing with more awareness and depth, you can help yourself relax, reduce pain, release any anxiety and feel more in control. By breathing with awareness, you can also help make each contraction more purposeful and productive, thereby shortening the amount of time you spend in labor.
About the Stages of Labor:
There are 3 stages of labor:
First stage: getting to 10cm dilated at which point the baby can pass through the cervix.
Second stage: pushing stage until baby is born.
Third stage: delivering the placenta.
There are 3 parts to the first stage of labor, which we’ll focus on here: early, active and transitional. At this point, the hardest part of labor will be finished, but you’ll still need to deliver your baby and, following that, the placenta. We’ll cover yoga poses for the entire first stage of labor. We’ll also cover breathing methods for the first and second (pushing) stage of labor.
EARLY LABOR:
About: This is the start of labor. You’ll feel consistent yet irregular, mild contractions with about 5-30 mins of rest in between each one. Contractions are sustained tightenings of the uterus. Your uterus will squeeze and release over a period of several hours to several days. This stage is the longest, but it’s not painful. You should be able to talk and walk easily. You might even want to sleep through some of it. Your cervix will dilate to 3cm in this stage.
Breath: Ujayyi or Brahmari.
Sequence:
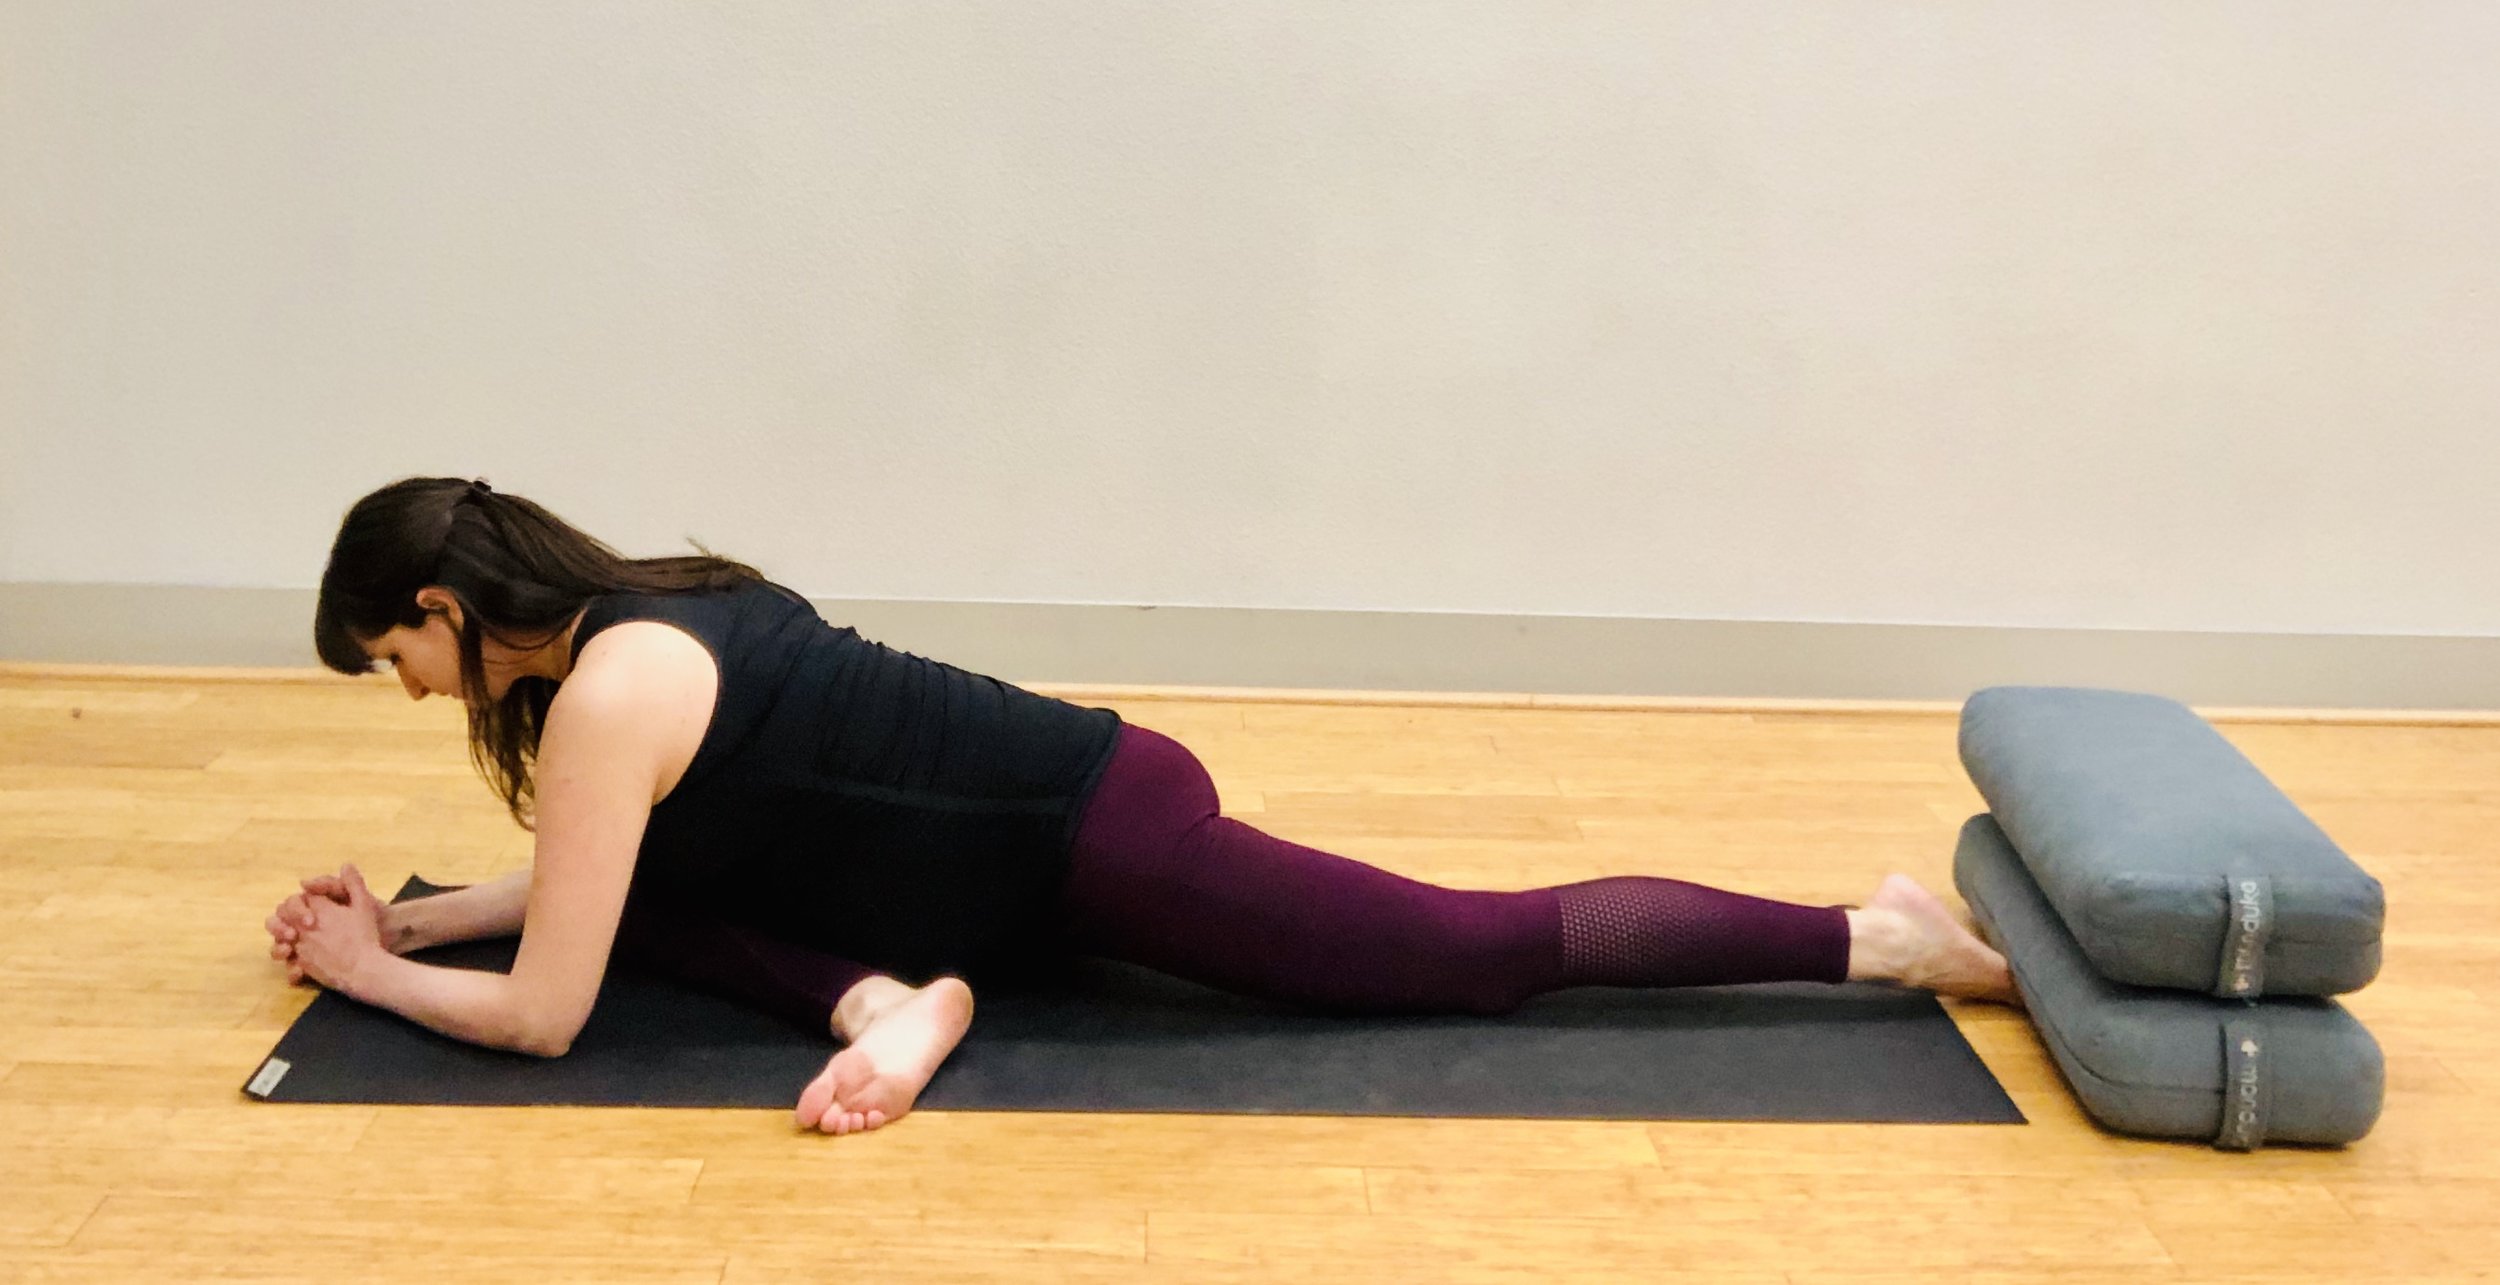
Child’s Pose:

Option #1; Child’s Pose with Bolsters or Pillows. Rest chest on cushions and extend arms out. Knees are wide.

Option #2: Child’s Pose with Birthing Ball. Allows for more space for belly and can feel good to rest forehead on the ball.
2. Cat/Cow: Move from one to the next for a couple mins. Inhale as you look up, exhale as you round your spine.
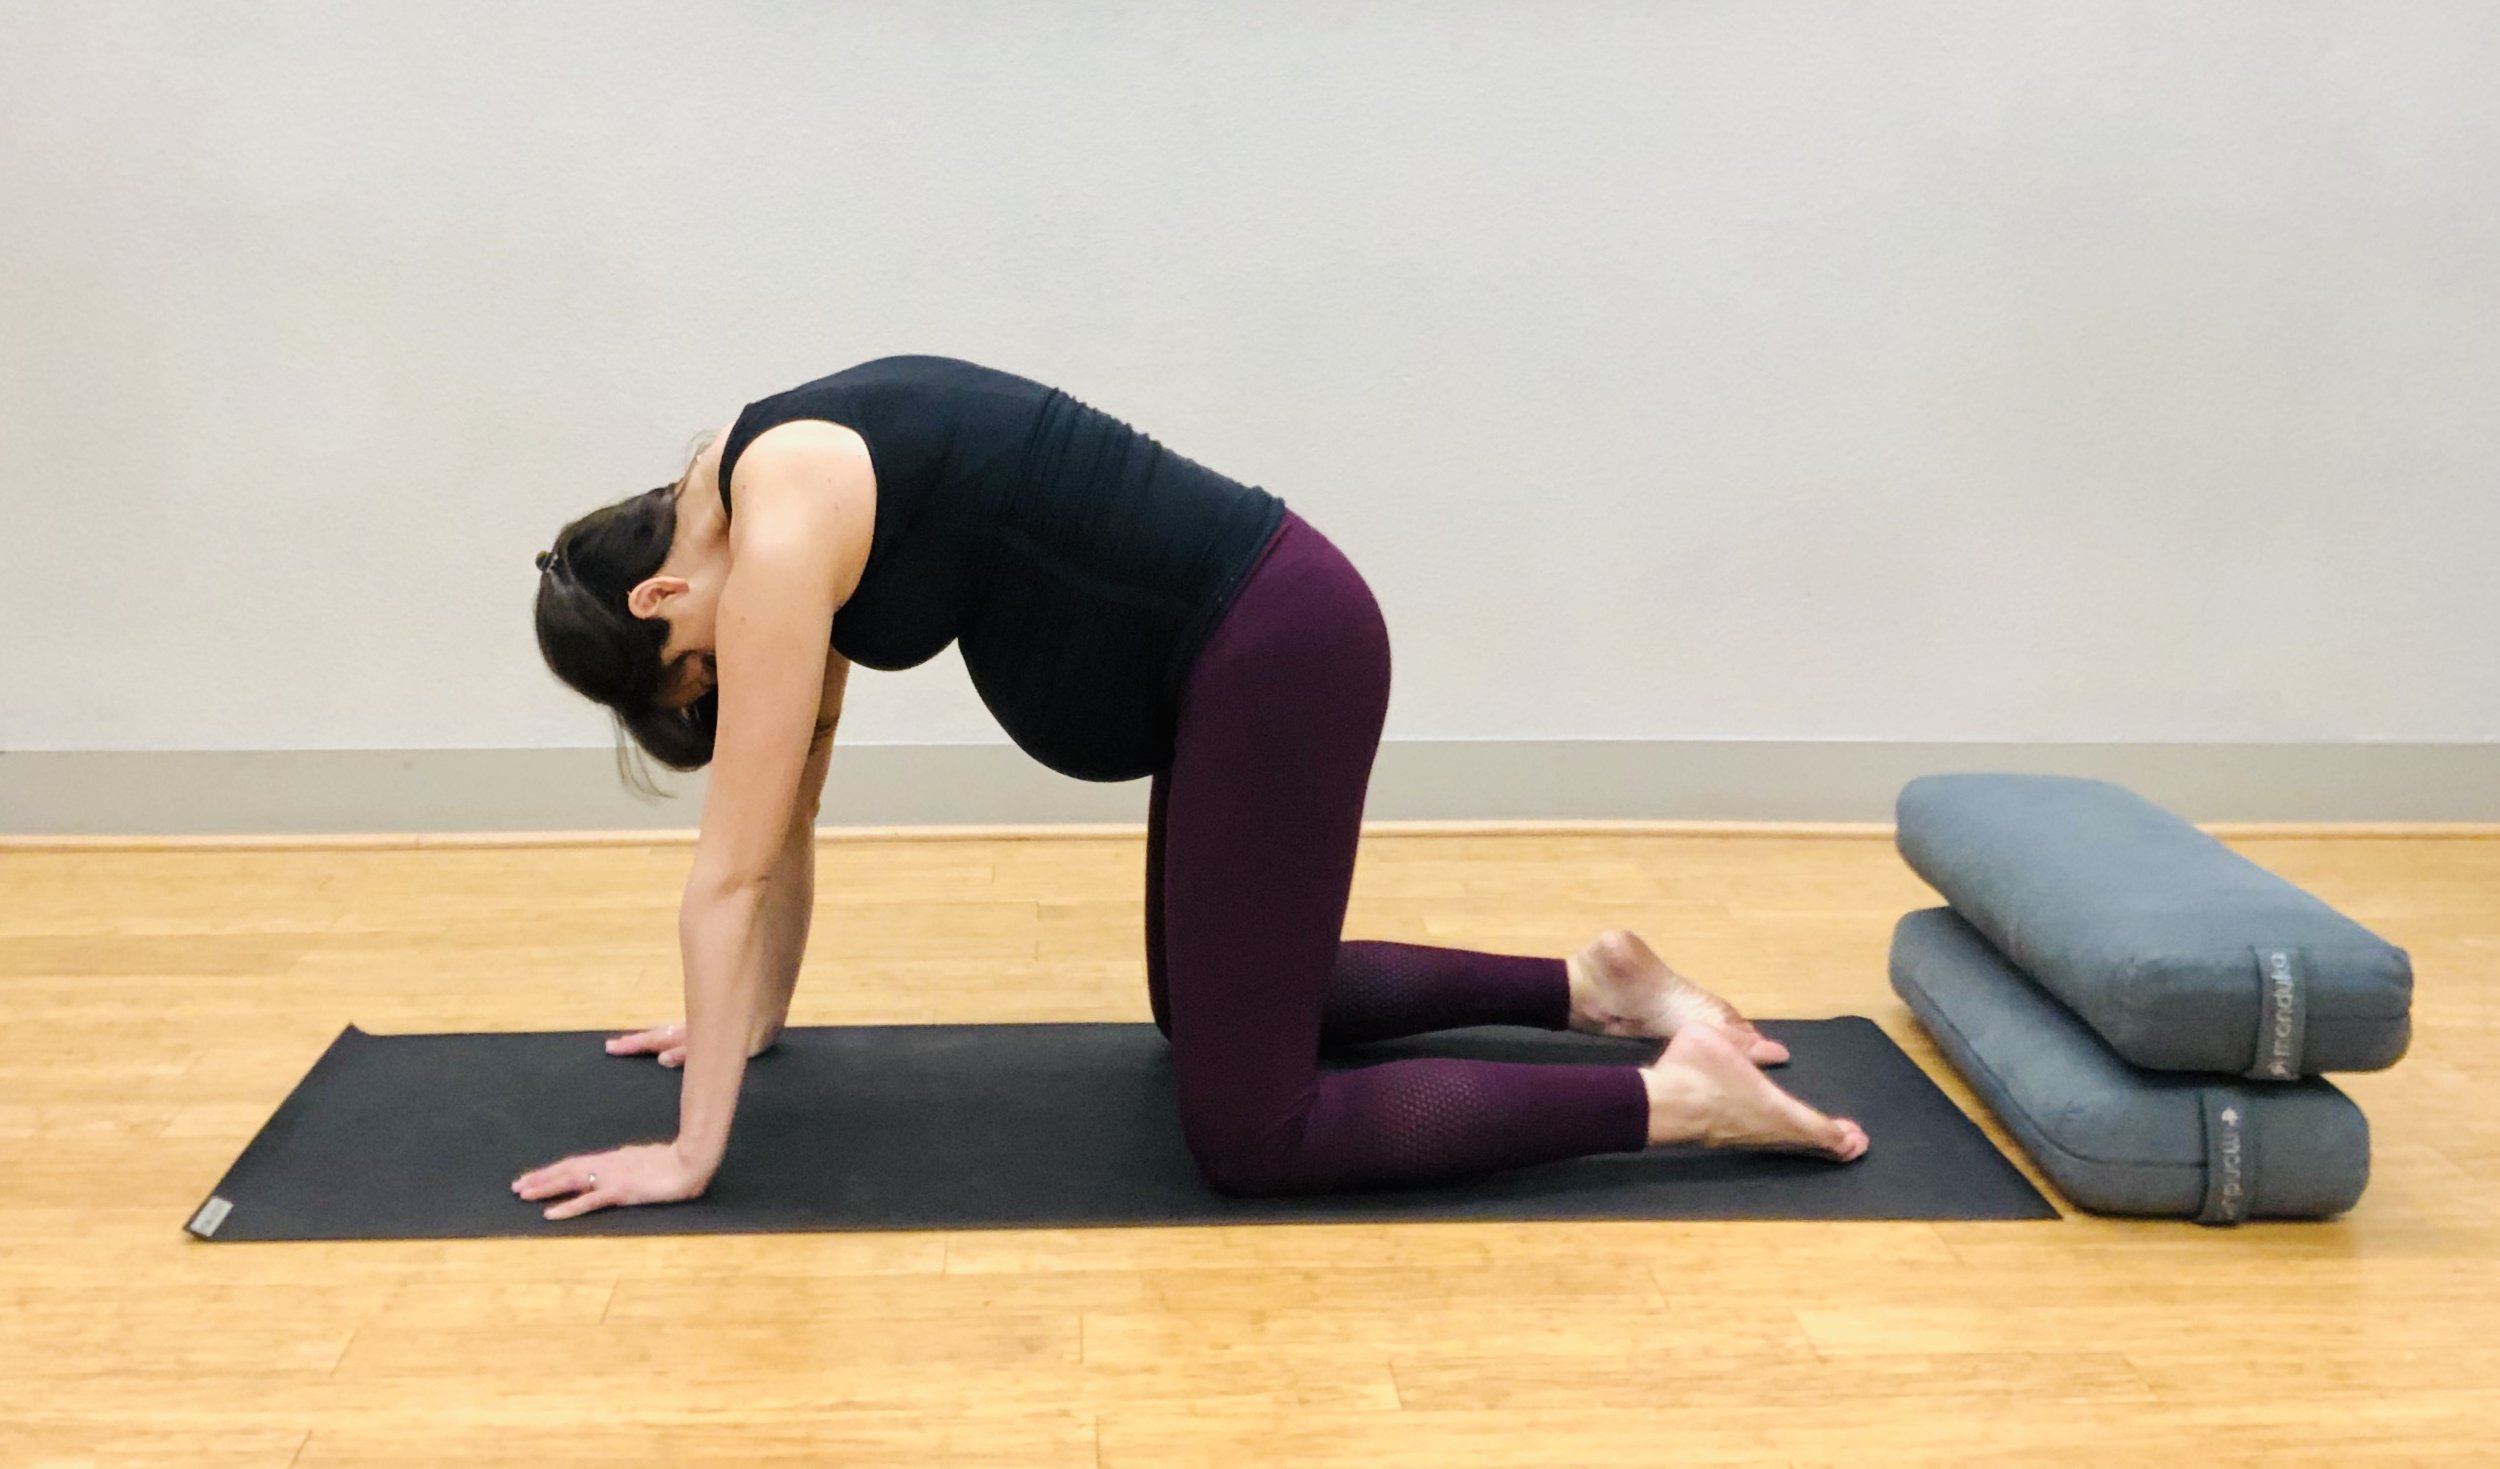
Cat Pose

Cow Pose
3. Squat

Squat. Other options include sitting on a ball, bolster or pillow. Heels may be lifted, but aim to keep feet wide and flat on the floor. See video for partner-assisted variations!
4. Standing Forward Fold

Standing Forward Fold. Keep feet wide to accommodate belly. Options include leaving hands on floor or grabbing elbows to hang and stretch neck and spine.
5. Supported Hip Circles: move in circles at least 3x in each direction. Support low back with palms on hips.

Supported Hip Circles: side view.

Supported Hip Circles: front view.
6. Supported Side Bends: move side to side 3x each direction. Support upper body with hand on bent side’s hip. Inhale at center, exhale to side.

Supported Side Bends: move from side to side, inhaling at center, exhaling to the side. Support back with hand on bent side’s hip. Bend at least 3x to each side.
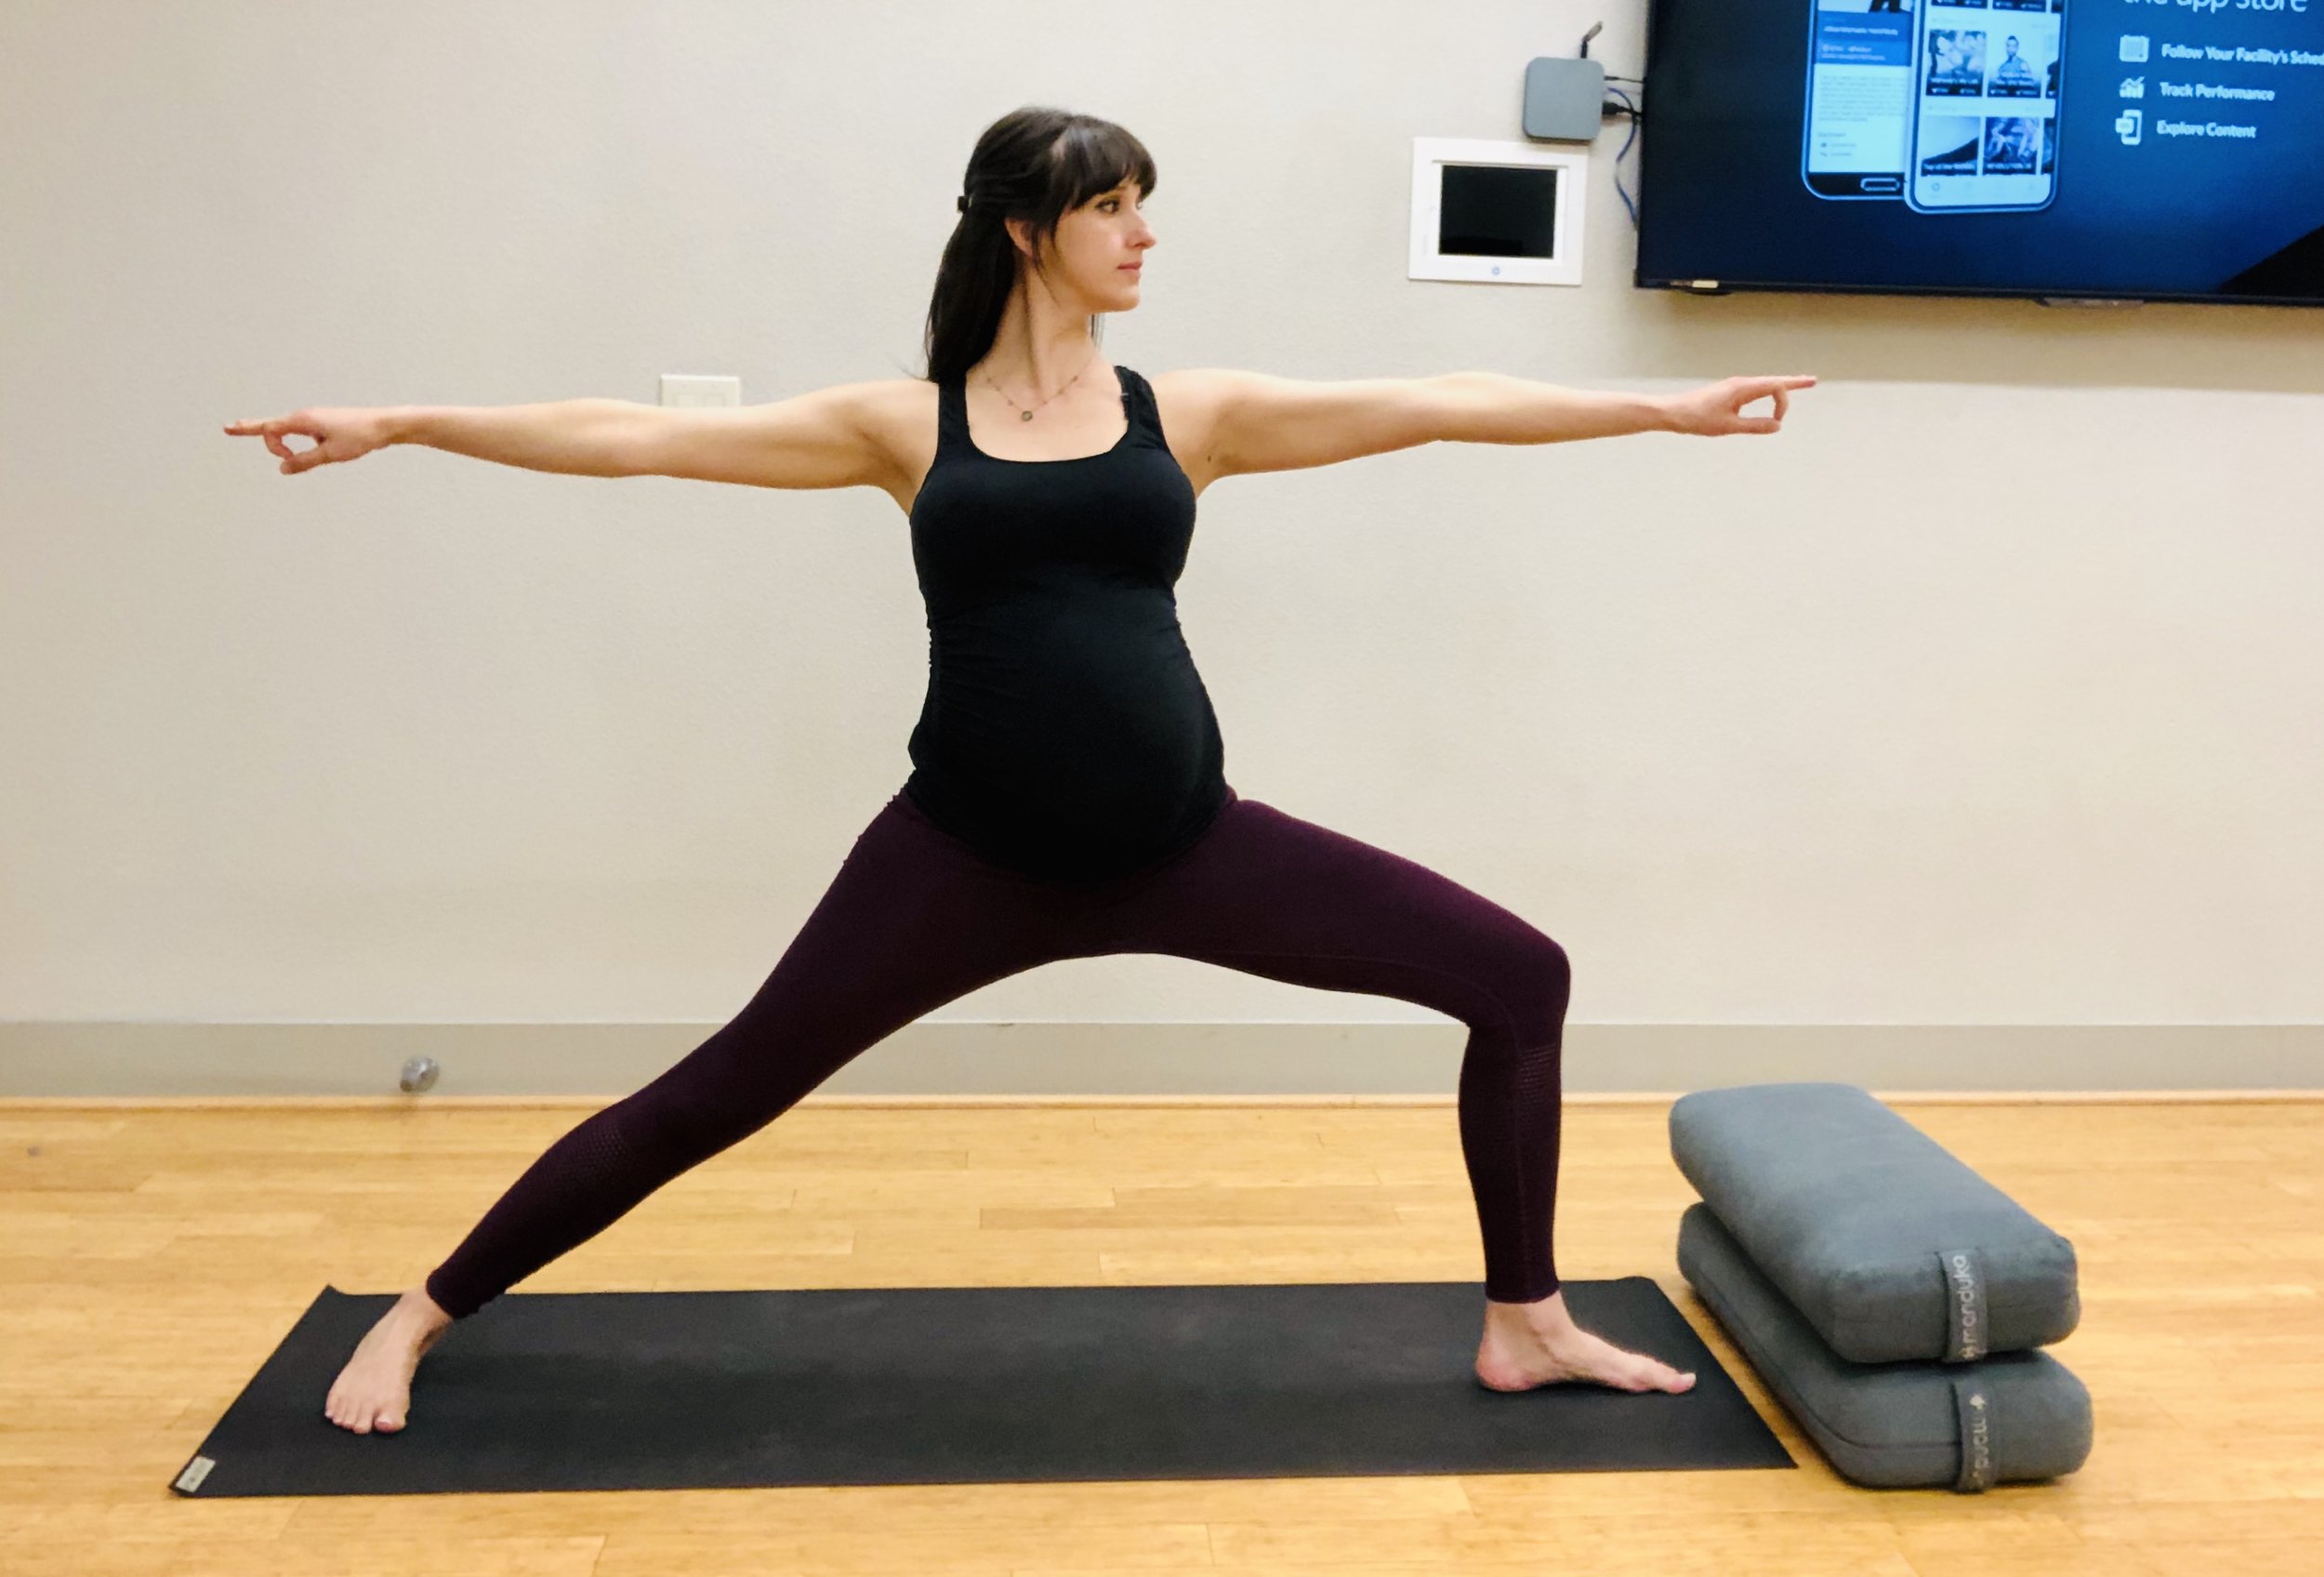
7. Warrior II

Warrior Pose. Stack bent knee over ankle.
8. Goddess Pose
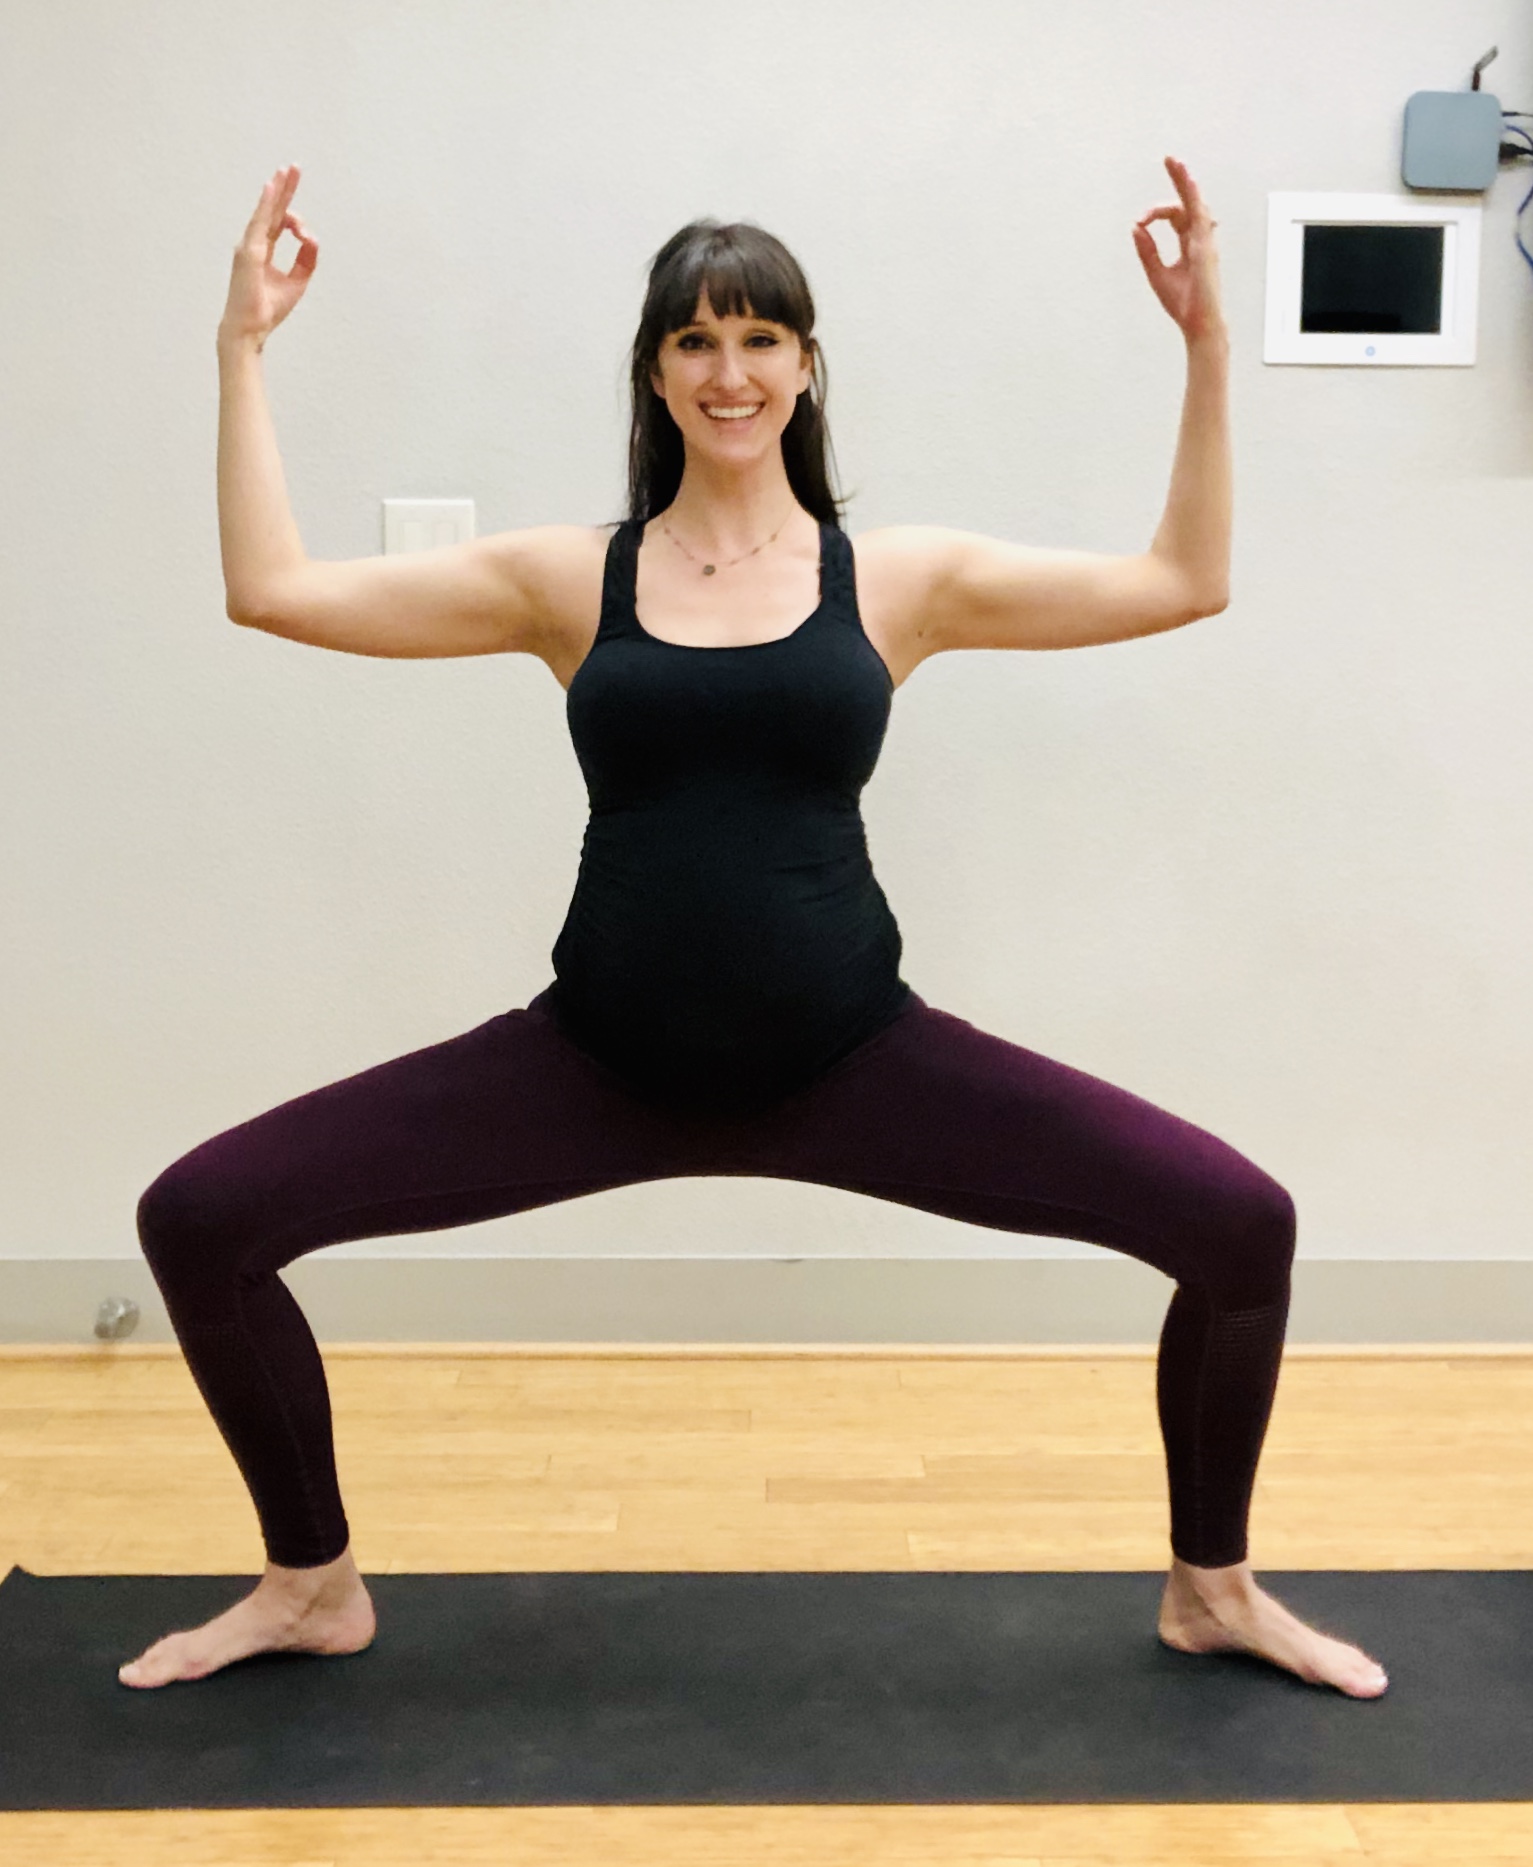
Goddess Pose. Heels in, toes out. Knees stacked over ankles.
9. Wide-Legged Forward Fold

Option #1: Wide-Legged Forward Fold

Option #2: Wide-Legged Forward Fold with Birthing Ball. May also use side of the bed, a partner, etc. Stretches back and legs.
10. Repeat Goddess Pose

Goddess Pose. Heels in, toes out. Knees stacked over ankles.
11. Warrior II on Other Side.
Warrior Pose in opposite direction. Stack bent knee over ankle.
12. Squat

Squat again to come to floor. Other options include sitting on a ball, bolster or pillow. Heels may be lifted, but aim to keep feet wide and flat on the floor. See video for partner-assisted variations!
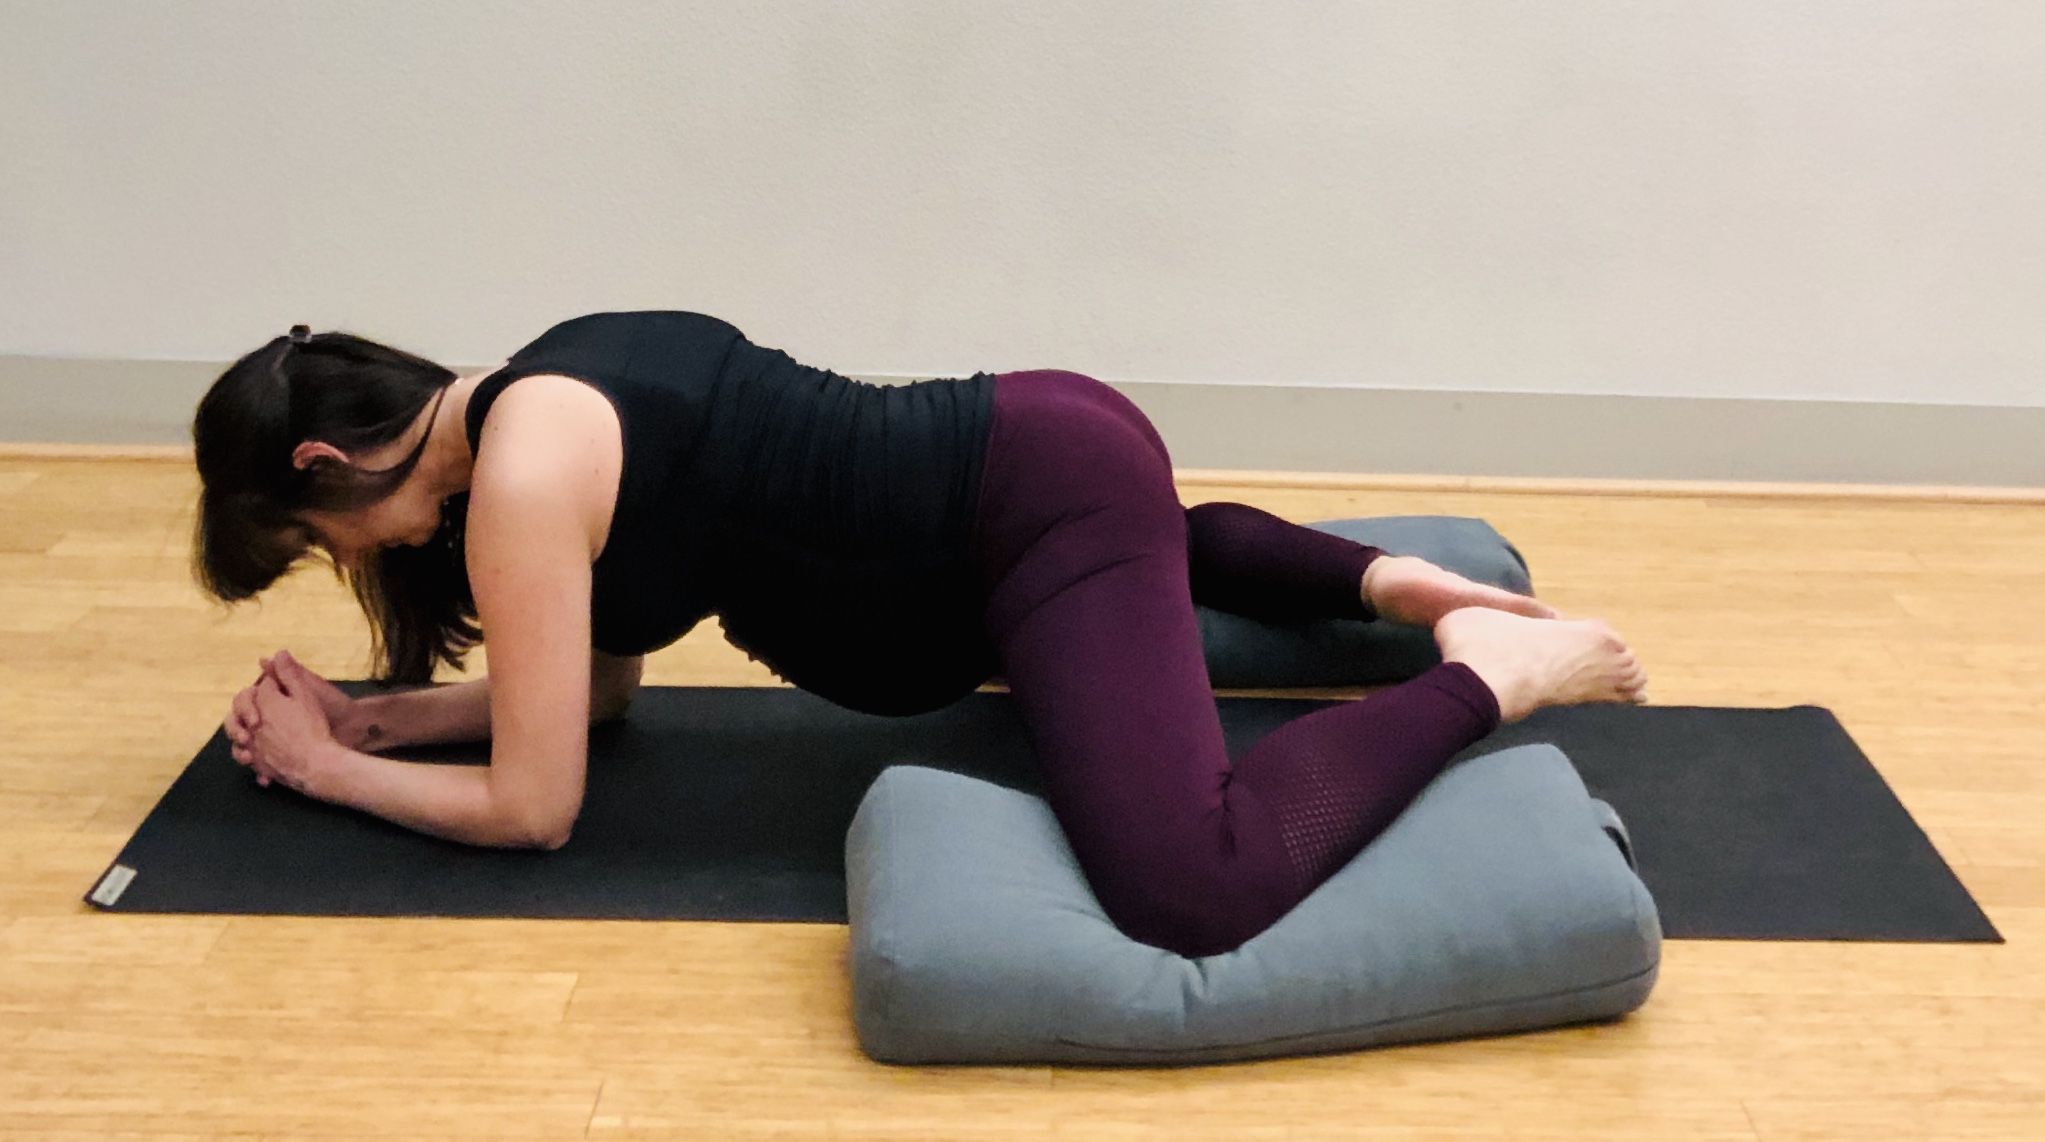
13. “Rock the Baby” Warm-Up; Move to Cow Face Pose.

“Rock the Baby Warm-Up.” Stretch outer hips in prep for Cow Face Pose.

Cow Face Pose. Stack knees one on top of the other. SIt on a block or bolster if either hip is lifted from floor or if knees are unable to cross.
14. Pigeon Pose
Pigeon Pose. Move front foot away from body to leave room for belly. If hip is lifted from floor, sit on a block, pillow or bolster on the bent knee’s side. Can sit upright or lean on forearms to deepen stretch.
15. REPEAT ON OTHER SIDE: “Rock the Baby” Warm-Up; Move to Cow Face Pose.

“Rock the Baby Warm-Up.” Stretches the outer hips in prep for Cow Face Pose. Bring opposite leg up this time (opp. side not shown).

Cow Face Pose. Stack knees one on top of the other. Sit on a block or bolster if either hip is lifted from floor or if knees are unable to cross.
16. Pigeon Pose on other side.

Pigeon Pose on other side (opp. side not shown).
17. Crescent Lunge

Crescent Lunge on knee. Be sure front knee is over ankle and hips are moving down towards the mat.
18. Table Top

Table Top. Move through this position to come to Crescent Lunge on the other side.
19. Crescent Lunge on Other Side.

Crescent Lunge with the opposite leg in front (opp. side not shown).
20. Butterfly

Butterfly Pose. Flutter knees, rock hips or walk hands in front of body to deepen stretch.
21. Frog Pose
Option #1: Frog Pose with feet towards each other. Bring hips gently forward, resting on forearms.

Option #2: Frog Pose with feet to the outside of knees.
ACTIVE LABOR:
About: Active labor consists of stronger, more intense contractions. According to Lamaze International, traditionally women have used the 5-1-1 rule; that is, when contractions come every 5 minutes, each lasting a full minute, and have been that way for an hour. More recent recommendations are 4-1-1 (four minutes apart) or even 3-1-1 (three minutes apart). At this point, you’ll likely only want to switch asanas in between contractions, after holding each asana through several contractions. This promotes dilation. This is also the stage where you might want to use props such as pillows, a birthing ball, an ice pack or warm pack. You might also want to ask your partner to assist you with poses or help with massage, nerve strokes, the rebozo (Mexican style blanket) and/or the sacrum squeeze. This is the phase when labor becomes more painful during contractions. Your cervix will dilate up to 7cm over a period of 2-6 hours.
Breath: Dirga Breath. Known as ‘3-Part-Breath’ or ‘Elevator Breath.’ Helps with inner strength and willpower. Also helps make each contraction more powerful and productive by keeping the flow of energy moving downwards. Imagine breath starting in the belly and rising up through the lungs until it comes to the throat for each inhale (this is opposite of how we normally think of breathing). Then focus on the breath, your energy and your baby moving downward with each long exhale.
Sequence:
- Child's Pose
- Cat/Cow
- Squat with support
- Mountain Pose
- Wide-Legged Forward Fold with support
- Crescent Lunge on knee. Switch legs.
- Frog
TRANSITION:
About:
At this stage, mom may become irritable, get a headache, feel restless, shaky, sweaty or nauseous. She might also feel like she needs to use the restroom as the baby presses on the bowels as it descends through the cervix. The birth partner can be of great help at this stage— even just to coach breathing, offer massage, apply nerve strokes or do the sacrum squeeze. Mom might not want to move at all, but depending on her circumstances, she can try to use gravity to her and the baby’s advantage. If she feels up for it, mom can move between poses after several contractions. This is the hardest part of labor, but will only generally last anywhere from 15 mins to less than an hour. The cervix will finish effacing and dilating to 10cm at this stage.
Breath:
Modified Kapalbhati breath or ‘Hee Hee Who’ breath of lamaze classes. Both convert pain to energy and rejuvenate you. Using breath at this stage helps keep energy moving down. For the modified Kapalbhati breath, take a long inhale through the nose with 3 or 4 strong exhales out through the mouth. Normally, this is a forceful belly breath with full abdominal expansion and retraction, but we’re modifying it for this stage in labor. Traditional lamaze-style breathing is when you suck in breath 2 to 5 times (whatever feels the best to you) and then let the air go in a longer exhale. The focus is still on the exhale, but you’ll take several inhales before one long exhale which is reverse of the Kapalbhati technique. This is the ‘Hee Hee Who’ or ‘Pant Pant Blow’ breath that you often see in movies and lamaze classes. The emphasis is on light inhalations with a prolonged exhalation. Practice both styles of breathing ahead of time to see which feels the most comfortable to you!
Sequence:
- Cat/Cow
- Squat
- Child Pose with birthing ball, partner, side of bed, etc. for upper body support.
PUSHING:
Breath: Modified Sukha Purvaka breath. Breathe in through your nose and hold your breath while bearing down during a contraction. Without exhaling, take another quick inhale and bear down again. Repeat 2 or 3 more times. Take a long exhale and relax until the next contraction. Visualize the breath moving the baby down and out. This breath shortens the amount of time you spend pushing and maximizes the efficiency of each contraction.